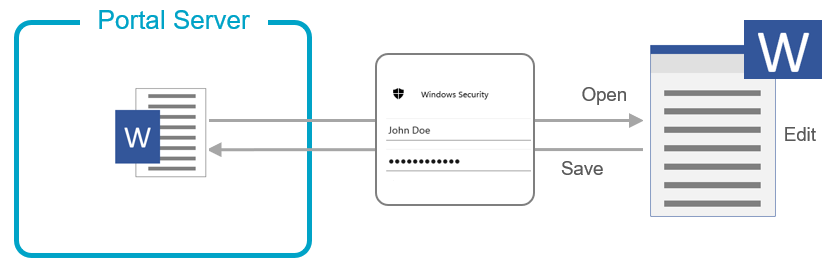
WebDAV authentication
Portal user authentication is required to access a file on the Intrexx Portal Server from the portal.
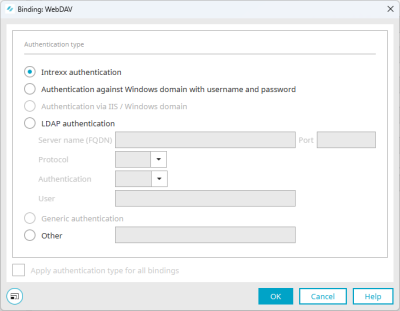
The following authentication types are available for selection:
-
Intrexx authentication
-
Windows domain authentication with username and password
-
Authentication with SSO via Windows Integrated Authentication (IIS)
-
LDAP authentication
-
Other
Step-by-step guide
To configure WebDAV authentication, proceed as follows:
-
Start the "Users" module.
-
Click on the "User" menu item.
-
Select the "Configuration..." entry.
The "User Manager configuration" dialog box is displayed.
-
Click on the
 icon to the right of "WebDAV".
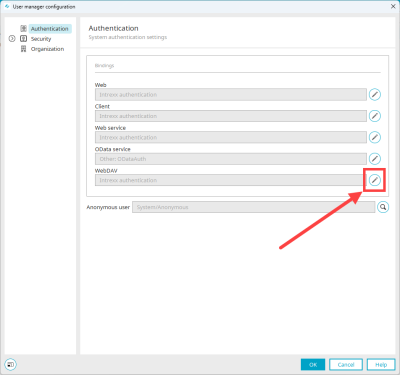
The "Binding: WebDAV" dialog box is displayed.
Intrexx authentication
Regardless of membership in local domains, every user should log in to the portal with their username and password found in the "Users" module. Select the user who will assume the role of anonymous user from the Anonymous user drop-down list. The anonymous user is the user who accesses the portal without logging on. This account will be used for all users before logging on. The type of authentication can be changed at a later point in time in this dialog. The change will only take effect once the users are imported.
Windows domain authentication with username and password
With this authentication type, the user name and password of the user from the Windows Active Directory domain are used and checked.
Authentication with SSO via Windows Integrated Authentication (IIS)
This authentication type enables SSO (Single Sign-on) via Integrated Windows Authentication and the IIS (see Windows - Configure IIS (Internet Information Services)).
For this type of authentication to work, you must set your portal to Windows Auth.
In addition, some adjustments must be made in connection with the IIS. These are described below.
Step-by-step guide
-
Create a new directory for the IIS website (e.g. C:\InetPub\ixsite), which you added in connection with the Intrexx deployment (see Add website in IIS).
-
Navigate to the htmlroot directory (org/<portalname>/external/htmlroot).
-
Copy the bin directory and the web.config file to the clipboard.
-
Add the bin directory and the web.config file to the newly created directory for the IIS website (e.g. C:\InetPub\ixsite).
-
Make the adjustments described below in the web.config. file.
-
Add the following code section to the web.config file:
<modules runAllManagedModulesForAllRequests="true" runManagedModulesForWebDavRequests="false"> <remove name="WebDAVModule" /> <add name="IxProxyHeadersHttpModule" preCondition="managedHandler" type="UnitedPlanet.Intrexx.Web.IxProxyHeadersHttpModule" /> <add name="IntrexxWindowsAuthHttpModule" preCondition="managedHandler" type="UnitedPlanet.Intrexx.Web.IxWindowsAuthHttpModule" /> </modules> <handlers> <remove name="WebDAV"/> <remove name="OPTIONSVerbHandler"/> <remove name="ExtensionlessUrlHandler-ISAPI-4.0_32bit" /> <remove name="ExtensionlessUrlHandler-ISAPI-4.0_64bit" /> <remove name="ExtensionlessUrlHandler-Integrated-4.0" /> <add name="ExtensionlessUrlHandler-ISAPI-4.0_32bit" path="*." verb="GET,HEAD,POST,DEBUG,PUT,DELETE,PATCH,OPTIONS" modules="IsapiModule" scriptProcessor="%windir%\Microsoft.NET\Framework\v4.0.30319\aspnet_isapi.dll" preCondition="classicMode,runtimeVersionv4.0,bitness32" responseBufferLimit="0" /> <add name="ExtensionlessUrlHandler-ISAPI-4.0_64bit" path="*." verb="GET,HEAD,POST,DEBUG,PUT,DELETE,PATCH,OPTIONS" modules="IsapiModule" scriptProcessor="%windir%\Microsoft.NET\Framework64\v4.0.30319\aspnet_isapi.dll" preCondition="classicMode,runtimeVersionv4.0,bitness64" responseBufferLimit="0" /> <add name="ExtensionlessUrlHandler-Integrated-4.0" path="*." verb="GET,HEAD,POST,DEBUG,PUT,DELETE,PATCH,OPTIONS" type="System.Web.Handlers.TransferRequestHandler" preCondition="integratedMode,runtimeVersionv4.0" /> </handlers> -
Remove the <conditions> block under ReverseProxyInboundRule.
The file then looks like this:
<?xml version="1.0" encoding="UTF-8"?> <configuration> <!-- Configuration section-handler declaration area. --> <configSections> <sectionGroup name="intrexxConfigurationGroup"> <section name="intrexxConfiguration" allowDefinition="Everywhere" allowLocation="true" type="UnitedPlanet.Intrexx.Web.IntrexxConfigurationSection" /> </sectionGroup> </configSections> <!-- Intrexx configuration settings. --> <intrexxConfigurationGroup> <intrexxConfiguration enableKerberosDelegation="false"> <kerberos excludeContextPaths="css,images,include,script,thirdparty,tmp,userfiles,download,is" servicePrincipalNames="" /> <!-- Define custom HTTP headers to be sent to the backend server. --> <customHttpHeaders> <!-- <add name="X-MY-HEADER-NAME" value="MyHeaderValue"/> --> </customHttpHeaders> </intrexxConfiguration> </intrexxConfigurationGroup> <system.web> <compilation debug="true" targetFramework="4.5.1" /> <httpRuntime maxQueryStringLength="32768" maxUrlLength="65536" targetFramework="4.5.1" /> <authentication mode="Windows" /> <authorization> <deny users="?" /> </authorization> </system.web> <system.webServer> <modules runAllManagedModulesForAllRequests="true" runManagedModulesForWebDavRequests="false"> <remove name="WebDAVModule" /> <add name="IxProxyHeadersHttpModule" preCondition="managedHandler" type="UnitedPlanet.Intrexx.Web.IxProxyHeadersHttpModule" /> <add name="IntrexxWindowsAuthHttpModule" preCondition="managedHandler" type="UnitedPlanet.Intrexx.Web.IxWindowsAuthHttpModule" /> </modules> <handlers> <remove name="WebDAV"/> <remove name="OPTIONSVerbHandler"/> <remove name="ExtensionlessUrlHandler-ISAPI-4.0_32bit" /> <remove name="ExtensionlessUrlHandler-ISAPI-4.0_64bit" /> <remove name="ExtensionlessUrlHandler-Integrated-4.0" /> <add name="ExtensionlessUrlHandler-ISAPI-4.0_32bit" path="*." verb="GET,HEAD,POST,DEBUG,PUT,DELETE,PATCH,OPTIONS" modules="IsapiModule" scriptProcessor="%windir%\Microsoft.NET\Framework\v4.0.30319\aspnet_isapi.dll" preCondition="classicMode,runtimeVersionv4.0,bitness32" responseBufferLimit="0" /> <add name="ExtensionlessUrlHandler-ISAPI-4.0_64bit" path="*." verb="GET,HEAD,POST,DEBUG,PUT,DELETE,PATCH,OPTIONS" modules="IsapiModule" scriptProcessor="%windir%\Microsoft.NET\Framework64\v4.0.30319\aspnet_isapi.dll" preCondition="classicMode,runtimeVersionv4.0,bitness64" responseBufferLimit="0" /> <add name="ExtensionlessUrlHandler-Integrated-4.0" path="*." verb="GET,HEAD,POST,DEBUG,PUT,DELETE,PATCH,OPTIONS" type="System.Web.Handlers.TransferRequestHandler" preCondition="integratedMode,runtimeVersionv4.0" /> </handlers> <defaultDocument> <files> <clear /> <add value="default.ixsp" /> </files> </defaultDocument> <rewrite> <rules> <rule name="RequestBlockingRule" stopProcessing="true"> <match url=".*" /> <conditions logicalGrouping="MatchAll" trackAllCaptures="false"> <add input="{URL}" pattern="/WEB-INF/*" /> </conditions> <action statusCode="404" statusDescription="The resource you are looking for is unavailable." statusReason="File or directory not found." type="CustomResponse" /> </rule> <rule name="ReverseProxyInboundRule" stopProcessing="true"> <match url="(.*)" /> <action type="Rewrite" url="http://localhost:1337/{R:1}" /> </rule> <rule name="WebSockets" stopProcessing="true"> <match url="wss://(.*)" /> <action type="Rewrite" url="ws://localhost:1337/{R:1}" /> </rule> </rules> </rewrite> <staticContent> <clientCache cacheControlMaxAge="3650.00:00:00" cacheControlMode="UseMaxAge" /> <!-- remove first in case they are defined in IIS already, which would cause a runtime error --> <remove fileExtension=".woff" /> <mimeMap fileExtension=".woff" mimeType="font/woff" /> <remove fileExtension=".woff2" /> <mimeMap fileExtension=".woff2" mimeType="font/woff2" /> </staticContent> <httpProtocol> <customHeaders> <add name="X-Frame-Options" value="SAMEORIGIN" /> </customHeaders> </httpProtocol> <httpErrors errorMode="Custom" existingResponse="PassThrough" /> <!-- Enable this to set the maximum allowed file size for file uploads. Default is 2 GB. --> <security> <requestFiltering> <requestLimits maxAllowedContentLength="2147483646" maxQueryString="32768" maxUrl="65536" /> </requestFiltering> </security> </system.webServer> <!-- Enable this to deactivate Windows Authentication for Application API access. --> <!-- <location path="api/app"> <system.web> <authorization> <allow users="*" /> </authorization> </system.web> <system.webServer> <security> <authentication> <windowsAuthentication enabled="false" /> <anonymousAuthentication enabled="true" /> </authentication> </security> </system.webServer> </location> --> </configuration> -
Start IIS.
-
Select the relevant site under "Sites".
-
Right-click on it.
-
Select "Manage website > Advanced settings".
The "Advanced settings" dialog box is displayed.
-
Select the item "Physical path".
-
Click on the 3-dot button.
-
Select the previously created directory for the IIS website (e.g. C:\InetPub\ixsite).
-
Click on "OK".
-
Restart IIS.
LDAP authentication
Server name (FQDN) / port
Enter the server name (FQDN) and the port for authentication here.
The FQDN (Fully Qualified Domain Name) is composed of the host name and the domain and thus designates the complete and unique address of an Internet presence. It is used for locating specific hosts on the Internet to call them by name resolution.
Encryption
Here you can choose between LDAP and LDAPS.
When encrypting with LDAPS, the certificate must be included in the Portal properties. A notification, which also explains the procedure, is displayed when LDAPS is selected.
Authentication
Select the authentication method of your LDAP server:
-
none
-
simple
-
strong
User
In an LDAP Bind Login three variables can be used, which will be expanded in run-time in the following order:
$[LOGIN_NAME] - Login name of the user饢
$[LOGIN_DOMAIN] - Login domain of the user饢
$[DN] - Distinguished Name of the user (usually entered via replication)For more information on LDAP authentication, click here.
Exit the dialog
When exiting the dialog, a message is displayed if the selected port does not correspond to the usual standard. If you want to change the port right away, close the notification window by clicking on the
 close icon in the upper right corner. If you close the notification by clicking on "OK", the dialog will also be closed, unless further messages are displayed. The port can then be changed by opening the dialog again.
Generic authentication
This authentication type is not available for WebDAV.
Other
Other authentication modules can be developed based on your needs. As examples, the authentication can be instituted here via X509 certificates, authentication to systems from third party providers, and so on. If you have any questions, please contact Consulting at INTREXX GmbH.
Apply authentication type for all bindings
This option is not available for WebDAV.
-
-
Select the desired authentication type.
-
Click on "OK".
You return to the "User Manager configuration" dialog box.
-
Click on "OK".

