Use cases
Send system messages in channels (Webhooks/Groovy process action)
Example
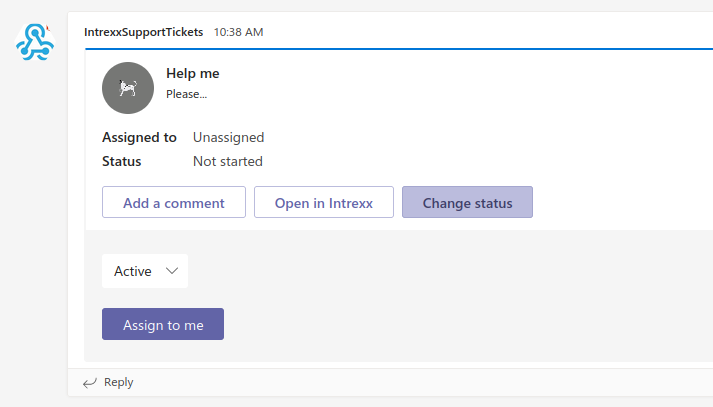
From an Intrexx application, a message is to be automatically created in a Microsoft Teams channel when a new data record is created in a data group (in this case, the "Support tickets" data group). The information from the data record is to be rendered as a card in the message with a button that opens the data record directly in Intrexx.
Requirements
The Intrexx portal must be accessible for incoming webhooks from the Internet.
Technologies used
-
Intrexx application and process with Groovy action
-
Inbound webhook for Microsoft Teams
Procedure
Step 1
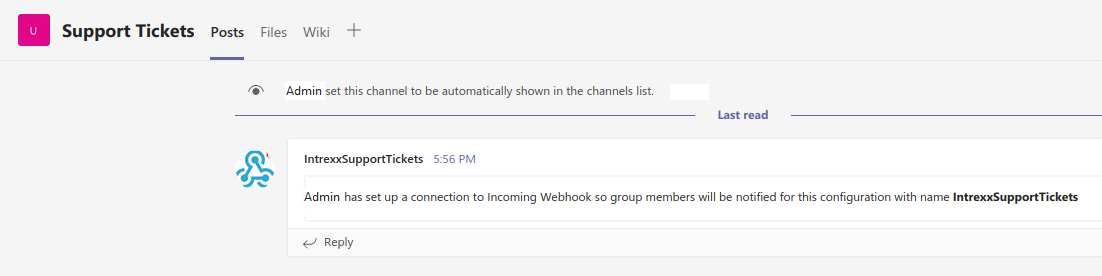
A channel for Intrexx support tickets is created in Microsoft Teams and a new inbound webhook is registered in it according to the instructions in "Create inbound Teams webhook". The webhook URL generated here must be noted.
Step 2
Import the example application and processes. You can download the ZIP file for the import here.
Step 3
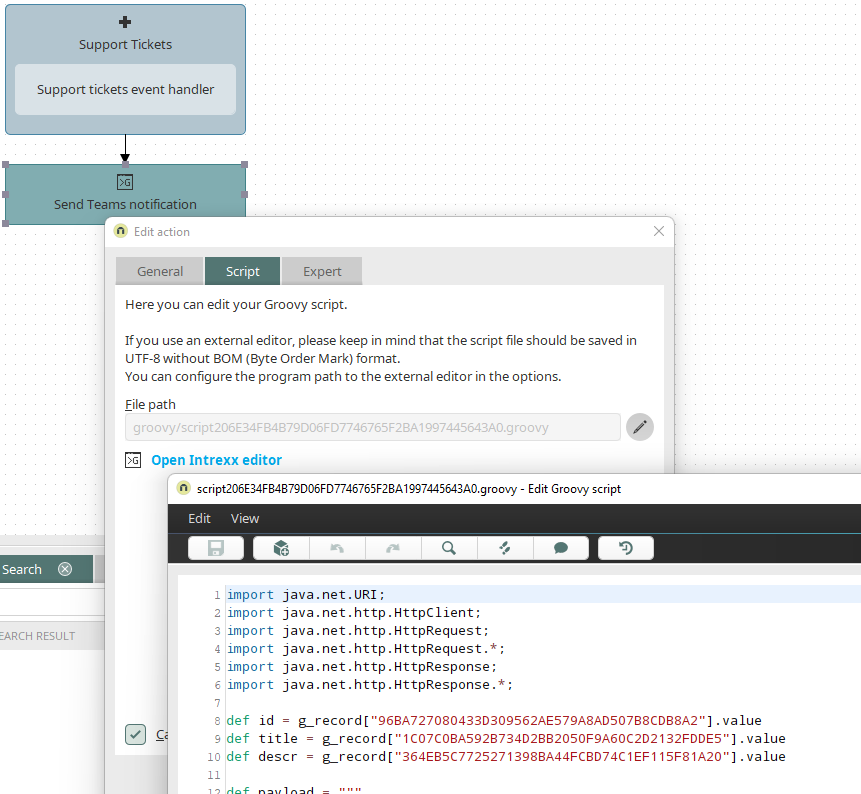
In the "MS365 Teams" example process you will find a Groovy action with the following script:
import java.net.URI;
import java.net.http.HttpClient;
import java.net.http.HttpRequest;
import java.net.http.HttpRequest.*;
import java.net.http.HttpResponse;
import java.net.http.HttpResponse.*;

def id = g_record["96BA727080433D309562AE579A8AD507B8CDB8A2"].value
def title = g_record["1C07C0BA592B734D2BB2050F9A60C2D2132FDDE5"].value
def descr = g_record["364EB5C7725271398BA44FCBD74C1EF115F81A20"].value

def payload = """
{
    "@type": "MessageCard",
    "@context": "http://schema.org/extensions",
    "themeColor": "0076D7",
    "summary": "Larry Bryant created a new support ticket",
    "sections": [{
        "activityTitle": "${title}",
        "activitySubtitle": "${descr}",
        "activityImage": "https://teamsnodesample.azurewebsites.net/static/img/image5.png",
        "facts": [{
            "name": "Assigned to",
            "value": "Unassigned"
        }, {
            "name": "Status",
            "value": "Not started"
        }],
        "markdown": true
    }],
    "potentialAction": [{
        "@type": "ActionCard",
        "name": "Add a comment",
        "inputs": [{
            "@type": "TextInput",
            "id": "comment",
            "isMultiline": false,
            "title": "Add a comment here for this task"
        }],
        "actions": [{
            "@type": "HttpPOST",
            "name": "Add comment",
            "target": "https://docs.microsoft.com/outlook/actionable-messages"
        }]
    },  {
        "@type": "OpenUri",
        "name": "Open in Intrexx",
        "targets": [{
            "os": "default",
            "uri": "https://localhost:1337/path/app/?rq_AppGuid=5F0E4968468F8C4C36515228523D26B6CA16202F&rq_TargetPageGuid=6C02ABACBED2AFA937C1A6D97C2FA12937017C01&qs_link=946E2A263B44AB6052F8556F08B2EF64F49F7464&qs_STRID=${id}"
        }]
    }, {
        "@type": "ActionCard",
        "name": "Change status",
        "inputs": [{
            "@type": "MultichoiceInput",
            "id": "list",
            "title": "Select a status",
            "isMultiSelect": "false",
            "choices": [{
                "display": "In Progress",
                "value": "1"
            }, {
                "display": "Active",
                "value": "2"
            }, {
                "display": "Closed",
                "value": "3"
            }]
        }],
        "actions": [{
            "@type": "HttpPOST",
            "name": "Assign to me",
            "target": "https://a75dafc0b855.ngrok.io/?qs_path=groovy/de/uplanet/lucy/sample/teams-change-ticket-status.groovy&id=${id}",
            "body": "{\\"status\\":\\"{{list.value}}\\", \\"ticketID\\":\\"${id}\\", \\"ticketTitle\\":\\"${title}\\", \\"ticketDescr\\":\\"${descr}\\"}",
			"bodyContentType": "application/json"
        }]
    }]
}
"""

g_syslog.info(payload)

HttpClient client = HttpClient.newBuilder().build();
HttpRequest request = HttpRequest.newBuilder()
        .uri(URI.create("<Webhook-URL>"))
        .POST(BodyPublishers.ofString(payload))
        .build();

HttpResponse<String> response = client.send(request, BodyHandlers.ofString());
g_syslog.info(response.statusCode());
g_syslog.info(response.body());
Here, replace the "<Webhook URL>" with the webhook URL that you copied in Step 1 of this guide. Save and activate the process.
Step 4
In order to react to a user action to a card in Teams in Intrexx, an HTTP endpoint is needed as a Groovy script. The following script "groovy/de/uplanet/lucy/sample/teams-change-ticket-status.groovy" must be saved in the portal directory for this purpose. The script can then update the data record in Intrexx accordingly.
import java.io.*
import de.uplanet.io.IOHelper

ByteArrayOutputStream bos = new ByteArrayOutputStream();
IOHelper.copyStream(bos, g_request.getInputStream())
def id = g_request["id"]
def body = new String(bos.toByteArray())
def json = g_json.parse(body)
//def reply = "Hello from Intrexx, ${json.from.name}"
def title = json["ticketTitle"]
def descr = json["ticketDescr"]

def user = ""
if (g_session != null)
    user = g_session.user.name
else
    user = "Supporter"

g_syslog.info("Ticket: " + id)
g_syslog.info(json)

def payload = """
{
    "@type": "MessageCard",
    "@context": "http://schema.org/extensions",
    "themeColor": "0076D7",
    "summary": "Larry Bryant created a new support ticket",
    "sections": [{
        "activityTitle": "${title}",
        "activitySubtitle": "${descr}",
        "activityImage": "https://teamsnodesample.azurewebsites.net/static/img/image5.png",
        "facts": [{
            "name": "Assigned to",
            "value": "${user}"
        }, {
            "name": "Status",
            "value": "Active"
        }],
        "markdown": true
    }],
    "potentialAction": [{
        "@type": "OpenUri",
        "name": "Open in Intrexx",
        "targets": [{
            "os": "default",
            "uri": "https://localhost:1337/path/app/?rq_AppGuid=5F0E4968468F8C4C36515228523D26B6CA16202F&rq_TargetPageGuid=6C02ABACBED2AFA937C1A6D97C2FA12937017C01&qs_link=946E2A263B44AB6052F8556F08B2EF64F49F7464&qs_STRID=${id}"
        }]
    }]
}
"""
response.json()
response.setHeader("CARD-UPDATE-IN-BODY", "true")
write(payload)
Step 5
The Groovy endpoint must be publicly accessible for Microsoft Teams, either directly in the portal on the Internet or via reverse proxy.
For this purpose, open the sample application in the portal and create a new data record. This new data record triggers the process action that creates the message in the channel via webhook call.
Click on "Change status" to select a new status via "Assign to me".
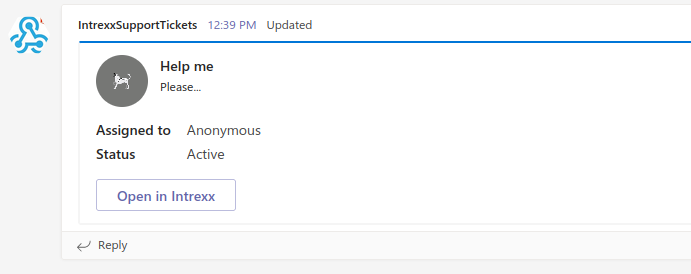
Click on "Assign to me" to send the card to the Intrexx webhook, which in turn responds with a new card, so that now only the "Open" action is available.
The "Open in Intrexx" button in the message can be used to call up the Intrexx data record directly in the browser.
You will find further information on this here:
Respond to Teams messages in Intrexx
Messages channel (webhooks)
Example
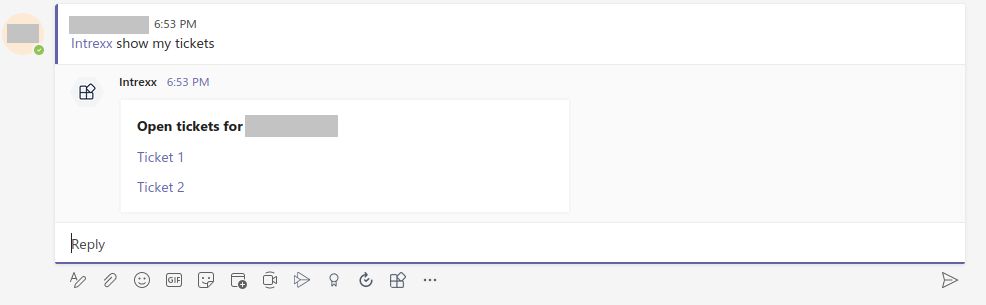
From a Teams channel, a request is to be sent to the Intrexx portal with "@mention", e.g. in order to display data from a data group ("my support tickets"). The information is to be rendered in the message as a card. In addition, a button in the message should enable the data record to be opened directly in Intrexx.
Preconditions
The Intrexx portal must be accessible for incoming webhooks from the Internet.
Technologies used
-
Intrexx sample application and Groovy HTTP endpoint
-
Outbound webhook for Microsoft Teams
Procedure
Step 1
Create the following Groovy script for the Intrexx HTTP endpoint at org/portal/groovy/de/uplanet/lucy/sample/teams-get-tickets.groovy:
import java.io.*
import de.uplanet.io.IOHelper
import de.uplanet.tools.HMACVerifier

ByteArrayOutputStream bos = new ByteArrayOutputStream()
IOHelper.copyStream(bos, g_request.getInputStream())
def bytes = bos.toByteArray()

def req = g_request.getHttpServletRequest()
def authHeader = req.getHeader("Authorization")
g_syslog.info(authHeader)

if (authHeader == null || !authHeader.startsWith("HMAC")) {
  g_syslog.error("Unauthorized request")
  response.setStatus(401)
  return
}

def key = "beuBhNzxssEKxljQ90tftG6Xc4Rf0gx/fjZR28V31aw="
def hmac = authHeader.substring(5)
g_syslog.info(hmac)

if (!HMACVerifier.verify(hmac, key, bytes)) {
  g_syslog.error("Unauthorized request")
  response.setStatus(401)
  return
}

def body = new String(bytes)
def json = g_json.parse(body)
def reply = """
   {
    "type": "message",
    "attachments": [
        {
            "contentType": "application/vnd.microsoft.card.adaptive",
            "content": {
                "type": "AdaptiveCard",
                "version": "1.4",
                "body": [
                    {
                        "type": "TextBlock",
                        "text": "**Open tickets for ${json.from.name}**"
                    },
                    {
                        "type": "TextBlock",
                        "text": "[Ticket 1](https://localhost:1337/)"
                    },
                    {
                        "type": "TextBlock",
                        "text": "[Ticket 2](https://localhost:1337/)"
                    }
                ]
            }
        }
    ]
}
"""
g_syslog.info(reply)
response.json()
write(reply)
Step 2
Create a channel for Intrexx support tickets in Teams and register a new outbound webhook in it according to the instructions in "Create Teams Outbound Webhook". Enter the URL to the Groovy script endpoint under "Callback URL" (e.g. https://my.intrexx.org/?qs_path=groovy/de/uplanet/lucy/sample/teams-get-ticktes.groovy). Also note the passphrase for signing the requests.
Step 3
In Microsoft Teams, you can now address the bot as follows: @Intrexx Show my tickets
You will find further information on this here:
Interact with bots in Chats/Groupchats/Channels
Teams Messaging Extensions Action for Intrexx Share Tasks
Example
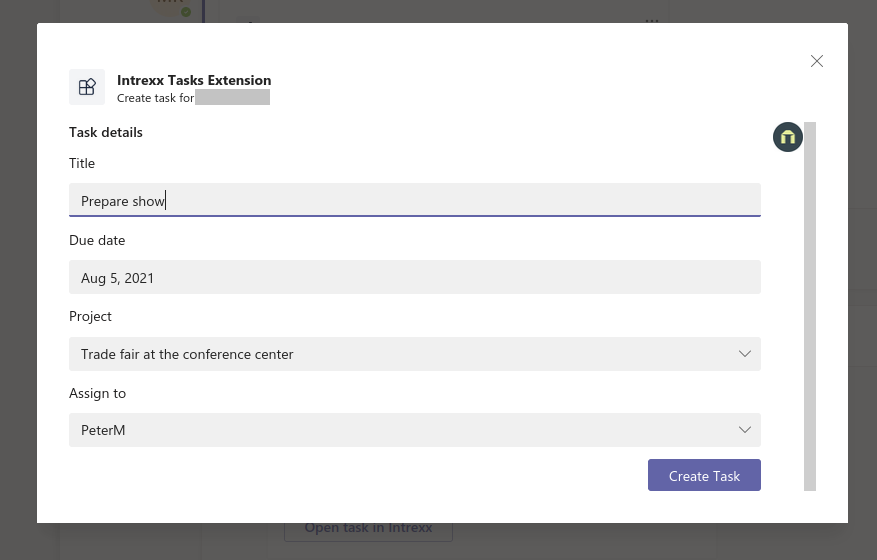
In Teams chats, group chats or channels, a task is to be created in Intrexx Share via a new or an existing message. A Teams Messaging Extension action with a bot is used for this purpose. On the Intrexx page, an OData service is offered for the task data group, which is called by the bot to create tasks.
Teams Bot Deployment
Requirements
-
Microsoft Teams is installed and you have an account
-
.NET Core SDK version 3.1
-
ngrok or equivalent tunneling solution
-
Visual Studio or Visual Studio Code with C#/.Net extension
-
Intrexx 21.09 Portal with Intrexx Share and the "Projects" module (this example is based on the Intrexx DemoPortal, but any other portal with Intrexx Share and the "Projects" module can be used)
Deploy and execute bot web app
Step 1
Clone the repository with
git clone https://github.com/UnitedPlanet/ms365-integration-samples.gitor download it here: teams-messaging-extensions-action-for-ix-tasks.zip
Step 2
If you are using Visual Studio:
-
Start Visual Studio
-
Select the menu "File / Open / Project/Solution"
-
Navigate to the folder "teams-messaging-extensions-action"
-
Here, select the file "TeamsMessagingExtensionsAction.csproj"
Step 3
Run ngrok point to port 3978 or use a reverse proxy to tunnel external https requests to the Intrexx Portal Server
ngrok http -host-header=rewrite 3978Step 4
Create a Bot Framework Registration Resource in Azure.
-
Use the current HTTPS URL you received when executing ngrok. Append the path "/api/messages", which is used in this example: https://xxxxx.ngrok.io/api/messages
-
Make sure that the Microsoft Teams channel is activated
-
If you do not have an Azure account, you can use this Bot Framework Registration.
Step 5
Update the appsettings.json configuration for the bot to use Microsoft App ID and App Password from the Bot Framework Registration. Please note that the app password is the same as the "client secret" in the Azure portal and that you can create a new client secret at any time. Also, provide the Intrexx user name and password for authentication with the Intrexx OData service.
Step 6
This step is specific to Microsoft Teams.
-
In the "manifest.json" file located in the "teamsAppManifest" folder, put the Microsoft App ID previously generated when registering the bot wherever you find the "<<YOUR-MICROSOFT-APP-ID>>" placeholder string. Depending on the scenario, the Microsoft App ID may appear in the "manifest.json" file several times.
-
Compress the contents of the teamsAppManifest folder to create a "manifest.zip".
-
Upload the manifest.zip to Teams. To do this, click on "Upload a custom app" in the app view.
Step 7
Run your bot - either using F5 from Visual Studio or using Dotnet run in a suitable folder.
Edit projects and recipient list for the task card
The task card contains two value lists for projects and recipients. These values can be edited in the "teams-messaging-extensions-action/Resources/taskCard.json" file.
{
"type": "TextBlock",
"text": "Project",
"size": "default"
},
{
"type": "Input.ChoiceSet",
"id": "taskProject",
"style": "compact",
"isMultiSelect": false,
"value": "",
"choices": [
{
"title": "My Tasks",
"value": "FEF3C9FB5C9F6F45C25E7EFD6149BB39F44CF04C"
},
{
"title": "Trade fair at the conference center",
"value": "C2838ACA9DBCB25EF5447D0C847FC9BFD53DEE81"
},
{
"title": "The digital kitchen",
"value": "2C44139F68ECC98CBB604CD1866FAF866E2449A6"
}
]
},
{
"type": "TextBlock",
"text": "Assign to",
"size": "default"
},
{
"type": "Input.ChoiceSet",
"id": "taskResponsibleUserId",
"style": "compact",
"isMultiSelect": false,
"value": "",
"choices": [
{
"title": "Administrator",
"value": "1"
},
{
"title": "PeterM",
"value": "6"
},
{
"title": "TinaM",
"value": "16"
},
{
"title": "FrankN",
"value": "17"
}
]
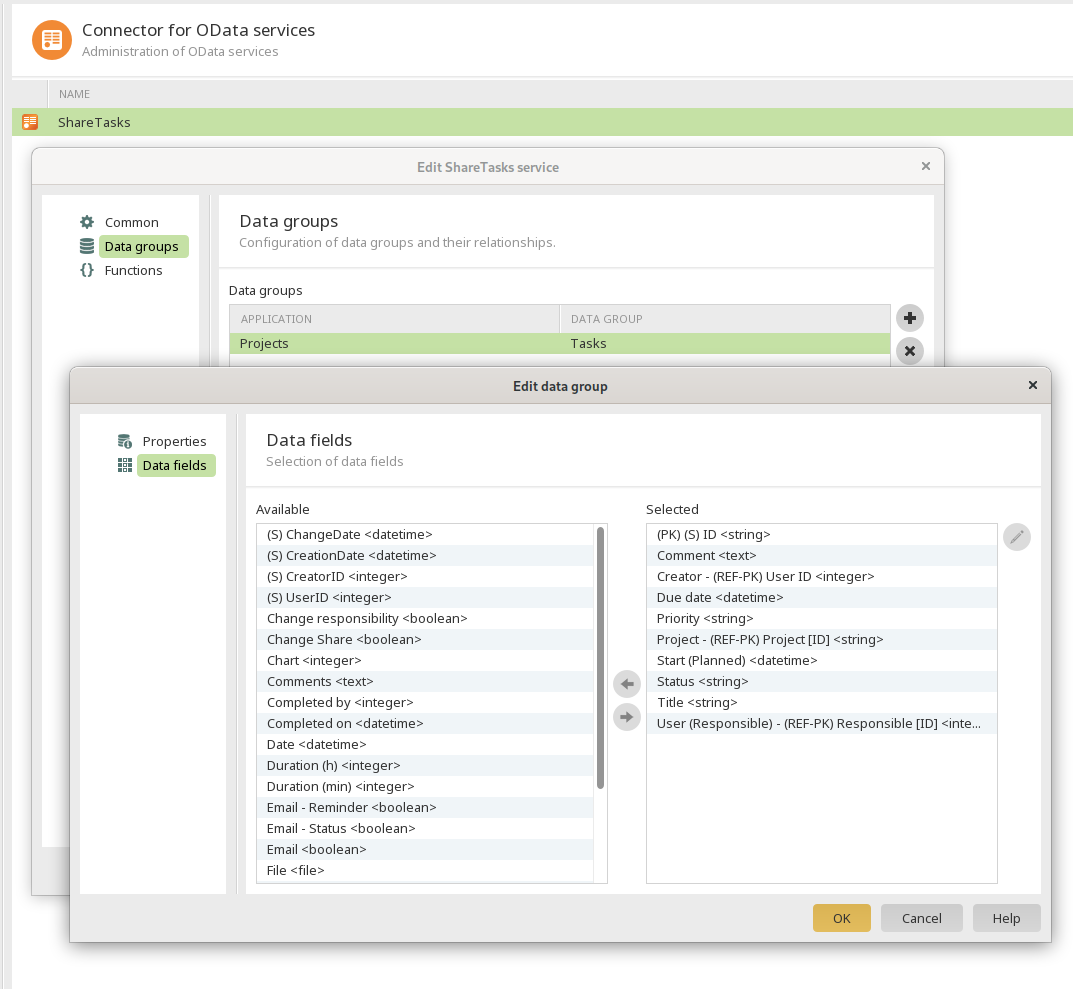
}The project list contains the project name and the GUID. These values can be determined in the "TSK_CATEGORIES" database table. The recipient list values are Intrexx user names and their user ID. These values can be determined in the "VBLUSER" view.
Deploy bot in Azure
See Deploying your bot for a complete list of instructions on how to deploy.
Deploy Intrexx OData service
To deploy the OData service in your portal, unpack the following ZIP file into the portal directory "internal/cfg/odata/producer" and restart the portal service. Subsequently, the OData service configuration should be available in the "Integration" module in the Portal Manager.
Download msteams-msg-extensions-share-task-odata.zip
Test the task creation
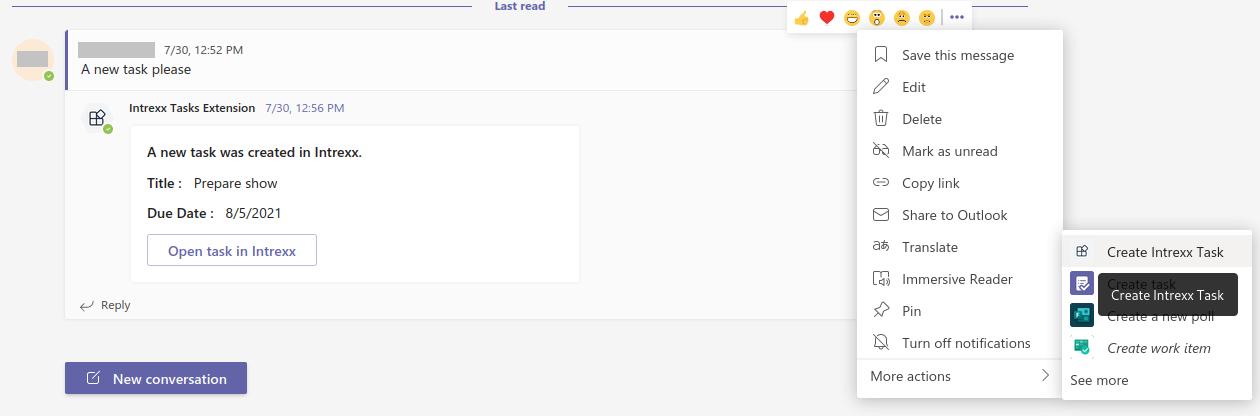
Click on "New conversation" in the Teams Channel and then on the app icon. Then select "Create Intrexx task". The task card is displayed if the bot is correctly registered and the bot service is available for Microsoft Teams via the ngrok tunnel.
After the task has been submitted, the bot responds with a summary and a link to the task in Intrexx.
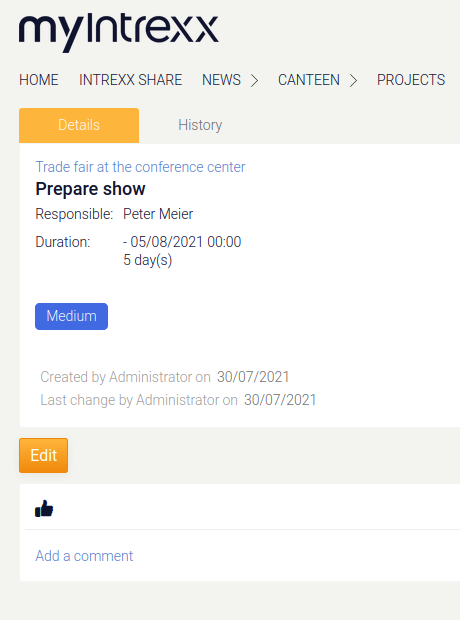
The task can be viewed immediately in Intrexx.
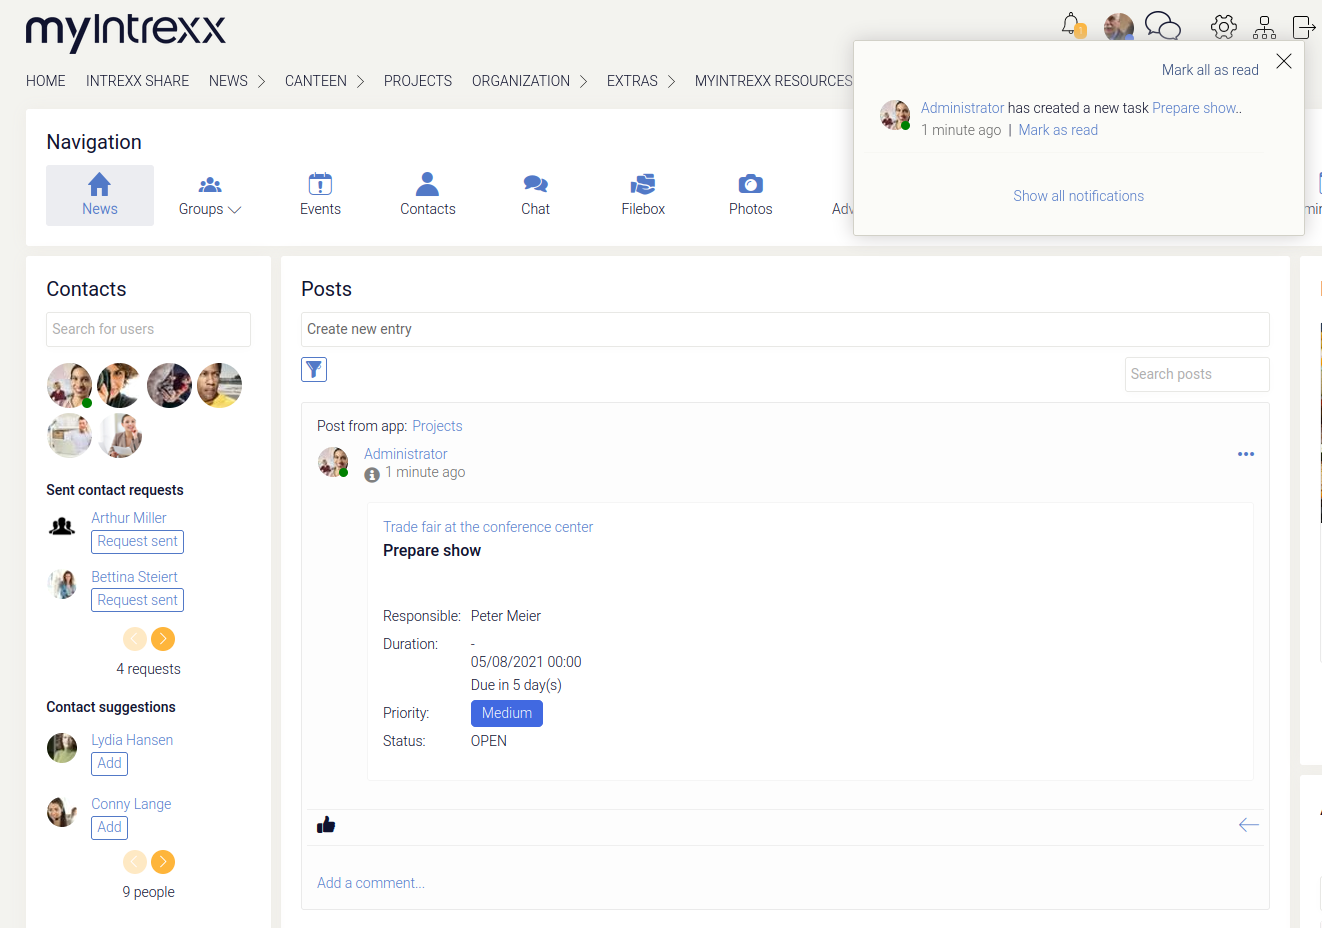
Responsible users receive a notification in Intrexx Share.
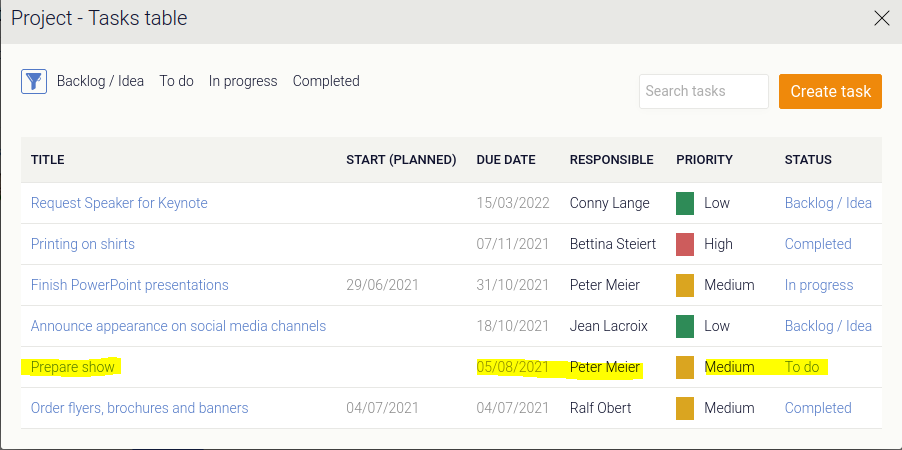
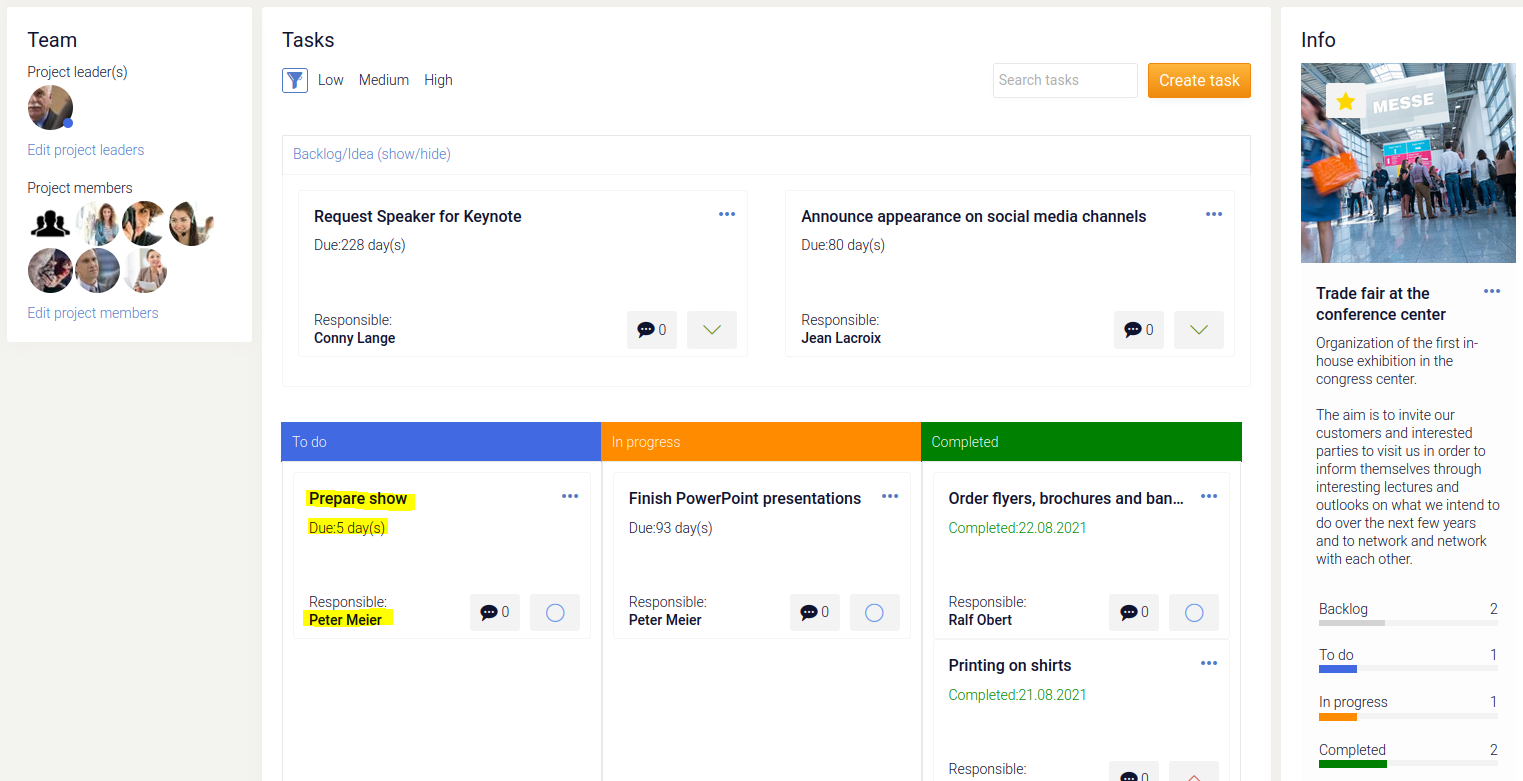
The task is also displayed in overviews and in the task table.
Use MS Graph SDK in Groovy process action
Authentication
The following classes are available in Groovy scripts for authentication with the MS Graph API.
import de.uplanet.lucy.server.odata.v4.consumer.http.MsGraphSdkAuthenticationProviderFactory

def clientId = "msgraphsdk"  // Name of the MS Graph OAuth2 configuration
def authFactory = new MsGraphSdkAuthenticationProviderFactory()
def accessTokenProvider = authFactory.createForCurrentUser(clientId) // 1) Anmeldung mit aktuellem Portaluser (Authorization Code)
def accessTokenProvider = authFactory.createForImpersonatedUser(clientId, "<USER_GUID>") // 2) Anmeldung mit statischem Benutzer aus Konfiguration (Password)
def accessTokenProvider = authFactory.createForServiceUser(clientId, "<USER_GUID>") // 3) Anmeldung mit Service Account aus Konfiguration (Client Credentials) -
Login with current portal user (authorization code flow)
This login redirects the portal user in the browser to the login to Microsoft 365 and then back to Intrexx. Only suitable for interactive actions.
-
Login with static user from configuration (password flow)
This login type uses a Microsoft 365 user from the configuration.
-
Login with service account from configuration (client credentials flow)
This login type uses a Microsoft 365 service account from the configuration.
Graph SDK examples
Send an email in processes
The following example shows how an email can be sent from processes or page handlers.
import de.uplanet.lucy.server.odata.v4.consumer.http.MsGraphSdkAuthenticationProviderFactory
import java.util.ArrayList;
import okhttp3.Request;
import com.microsoft.graph.models.BodyType;
import com.microsoft.graph.models.ChatMessage;
import com.microsoft.graph.models.EmailAddress;
import com.microsoft.graph.models.Importance;
import com.microsoft.graph.models.ItemBody;
import com.microsoft.graph.models.Message;
import com.microsoft.graph.models.Recipient;
import com.microsoft.graph.requests.GraphServiceClient;

def clientId = "msgraphsdk"  // Name of the MS Graph OAuth2 configuration
def authFactory = new MsGraphSdkAuthenticationProviderFactory()
def accessTokenProvider = authFactory.createForImpersonatedUser(clientId, "7312F993D0DA4CECCA9AE5A9D865BE142DE413EA") // 2) Anmeldung mit statischem Benutzer aus Konfiguration (Password)

def graphClient =
          GraphServiceClient
            .builder()
            .authenticationProvider(accessTokenProvider)
            .buildClient();

def message = new Message();
message.subject = "Hello";
message.importance = Importance.LOW;
def body = new ItemBody();
body.contentType = BodyType.HTML;
body.content = "Hi from <b>Intrexx</b>!";
message.body = body;
def toRecipientsList = new ArrayList<Recipient>();
def toRecipients = new Recipient();
def emailAddress = new EmailAddress();
emailAddress.address = "john.smith@intrexx365.com";
toRecipients.emailAddress = emailAddress;
toRecipientsList.add(toRecipients);
message.toRecipients = toRecipientsList;

def msgResponse = graphClient.me().messages()
    .buildRequest()
    .post(message);
def msgId = msgResponse.id;

graphClient.me().messages(msgId)
    .send()
    .buildRequest()
    .post();
Click here for more information:
https://docs.microsoft.com/en-us/graph/api/user-post-messages
Display and change the presence of the current user
The following example shows how the presence information for the current portal user can be queried and changed. You can download our example application here: ms365presence.zip
Groovy Page Rendering Handler (Before) to display the presence on a page (via VTL):
import de.uplanet.lucy.server.odata.v4.consumer.http.MsGraphSdkAuthenticationProviderFactory
import com.microsoft.graph.requests.GraphServiceClient

def clientId = "teams"  // Name of the MS Graph OAuth2 configuration
def authFactory = new MsGraphSdkAuthenticationProviderFactory()
def accessTokenProvider = authFactory.createForCurrentUser(clientId)

def graphClient = GraphServiceClient
            .builder()
            .authenticationProvider(accessTokenProvider)
            .buildClient()

def presence = graphClient.me().presence()
    .buildRequest()
    .get()

g_log.info(presence.activity)
g_log.info(presence.availability)

g_sharedState["my_activity"] = presence.activity
g_sharedState["my_availability"] = presence.availability
You can find more information about this here:
https://docs.microsoft.com/en-us/graph/api/presence-get?view=graph-rest-beta&tabs=java
Groovy page action handler (before) to change the presence via a view page:
import de.uplanet.lucy.server.odata.v4.consumer.http.MsGraphSdkAuthenticationProviderFactory
import com.microsoft.graph.requests.GraphServiceClient
import com.microsoft.graph.models.PresenceSetPresenceParameterSet;
import javax.xml.datatype.DatatypeConfigurationException;
import javax.xml.datatype.DatatypeFactory;
import javax.xml.datatype.Duration;

def clientId = "teams"  // Name of the MS Graph OAuth2 configuration
def authFactory = new MsGraphSdkAuthenticationProviderFactory()
def accessTokenProvider = authFactory.createForServiceUser(clientId)

def graphClient = GraphServiceClient
            .builder()
            .authenticationProvider(accessTokenProvider)
            .buildClient()

def upn = g_session.user?.emailBiz  // the current user's upn
def appId = "89094413-170f-440b-a3e7-6f8e45257531" // the azure app id
def myId = graphClient.users(upn).buildRequest().get().id; // get the current user's Azure id
def availability = g_request["dropdowncontrolAA8B5A6C"] // get the status
if (availability == null)
    availability = "Available"
def acitivity = availability == "Busy" ? "InACall" : availability; // get the activity
def expirationDuration = DatatypeFactory.newInstance().newDuration("PT5M"); // define expiration
def params = PresenceSetPresenceParameterSet.newBuilder() // build parameter set
        .withActivity(acitivity)
        .withSessionId(appId)
        .withAvailability(availability)
        .withExpirationDuration(expirationDuration)
        .build();

graphClient.users(myId).presence().setPresence(params).buildRequest().post();

g_log.info("Set presence for user ${upn}");
You can find more information about this here:
https://docs.microsoft.com/en-us/graph/api/presence-setpresence?view=graph-rest-beta&tabs=java
More information