Resource
The "Resource" application template provides you with a calendar where all portal users with the appropriate permissions ("User" role) can book resources such as meeting rooms or company vehicles.
Portal users with the "Manager" role can create resources, categories and calendar days. Categories must be assigned to the date when booking a resource. Using and assigning categories makes it easier to search for and find appointments. Category names are free choice. These are color-coded in the resource calendar.
Actions in the portal
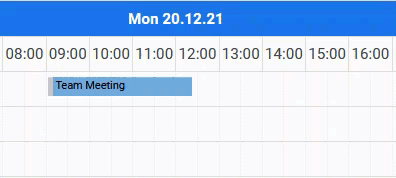
Book a resource
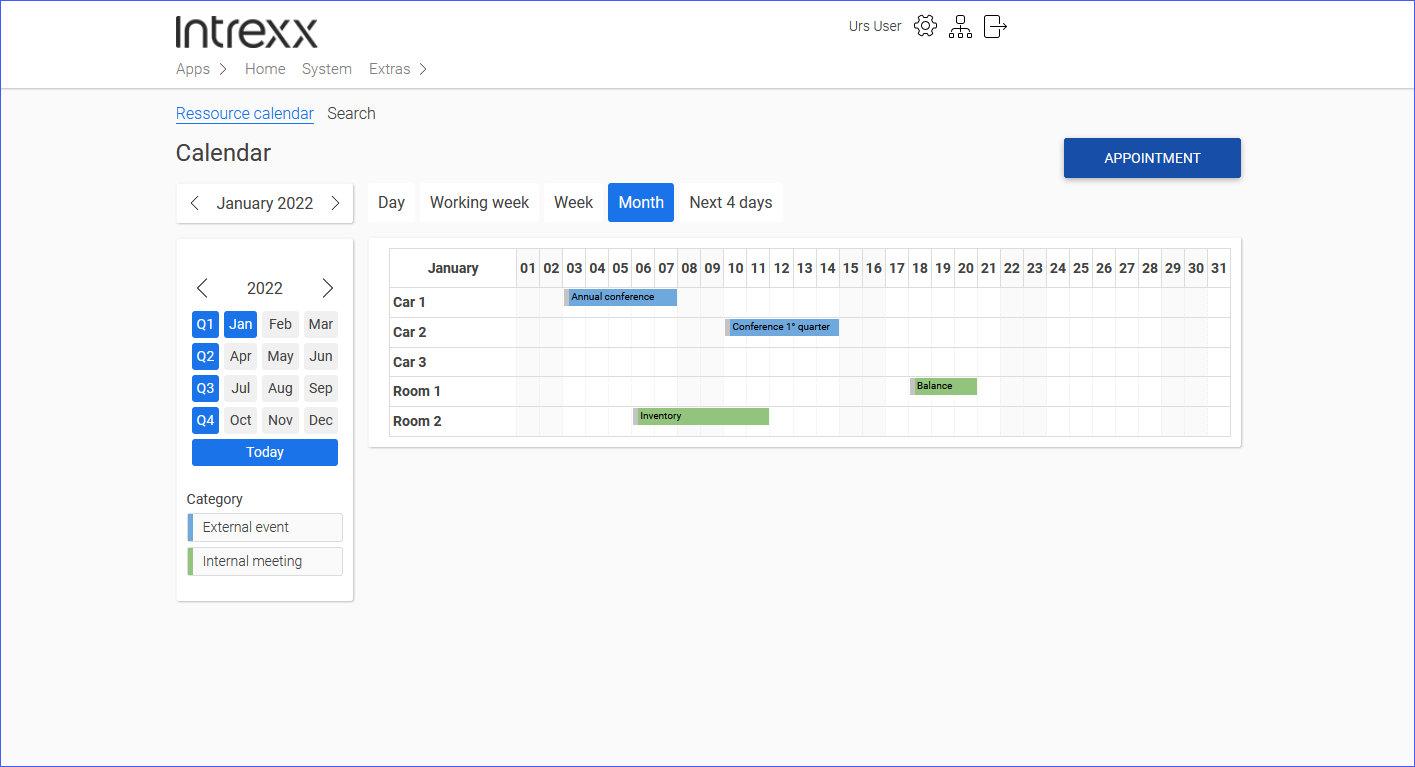
In the "User" role, you have access to the "Resource calendar" page. There, you can book a resource for specific appointments or for series of appointments.
![]()
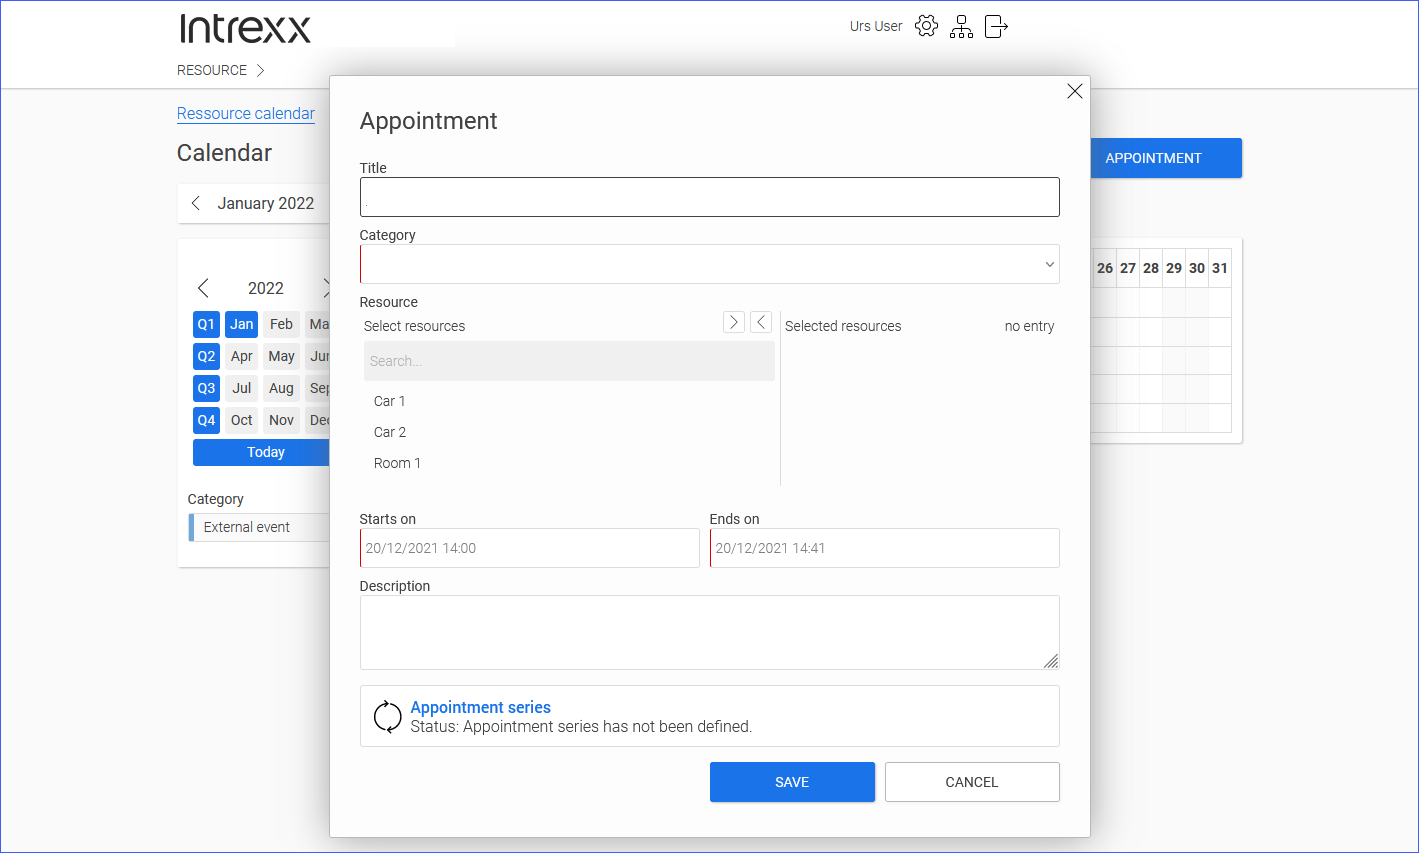
Title
Enter a title for the appointment here. This will be displayed later in the calendar.
Category
Assign a category to the appointment. The category will be displayed later in the calendar. Specifying a category makes it easier to find appointments via the "Search" page, among other things.
Resource
Using the arrow buttons you can move the resources from the left pane ("Select resources") to the right pane ("Selected resources"). The resources displayed on the right will be booked for the specified period after saving.
Starts on - End on
Enter the start and end date of the appointment here.
Description
(Optional) Here you can enter more detailed information about the appointment.
Appointment series
You can also create a series of appointments. Click on the word Appointment series.
More detailed information is available in the section Create appointment series
Click on the button to book a resource.
You can also click on an date field with the left mouse button. Afterwards, the window with information required for the appointment will be displayed. The previously selected date is then preset.
You can also select an appointment range by holding down the left mouse button. Afterwards, the window with information required for the appointment will be displayed. The start and end date of the appointment are then already preset.
Create appointment series
Click the button to book a resource for an appointment series.
![]()
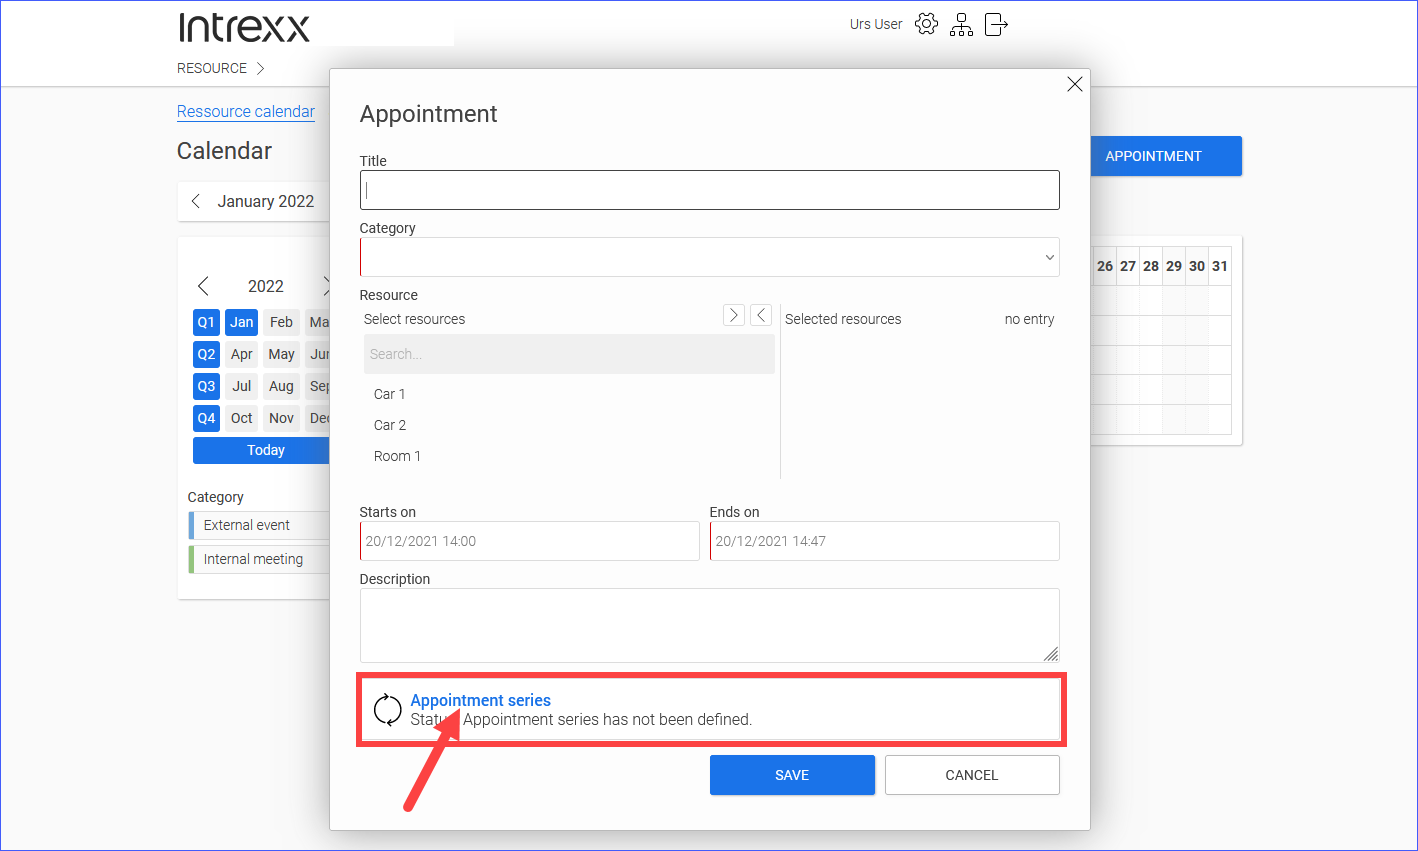
Click on the word Appointment series.
![]()
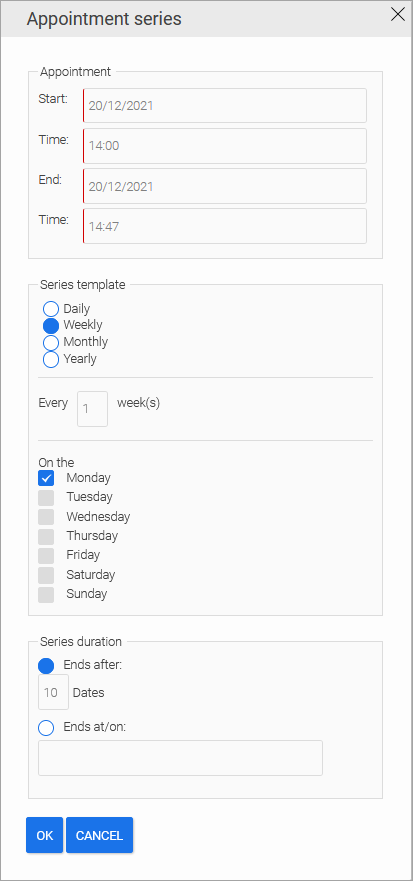
Enter the appropriate information.
Move appointments
You can move or change appointments in several ways.
Left-click on the appointment. The window with the appointment details will be displayed. Edit the data.
You can also move or change the appointment data using drag and drop.
![]()
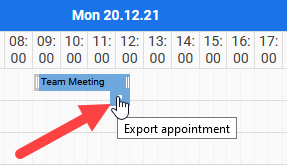
Export appointment
You can export appointments in Outlook format (.ics). To do this, click on the arrow icon in the displayed appointment.
![]()
Delete appointment
Left-click on the appointment you want to delete.
The window with the appointment details will be displayed.
![]()
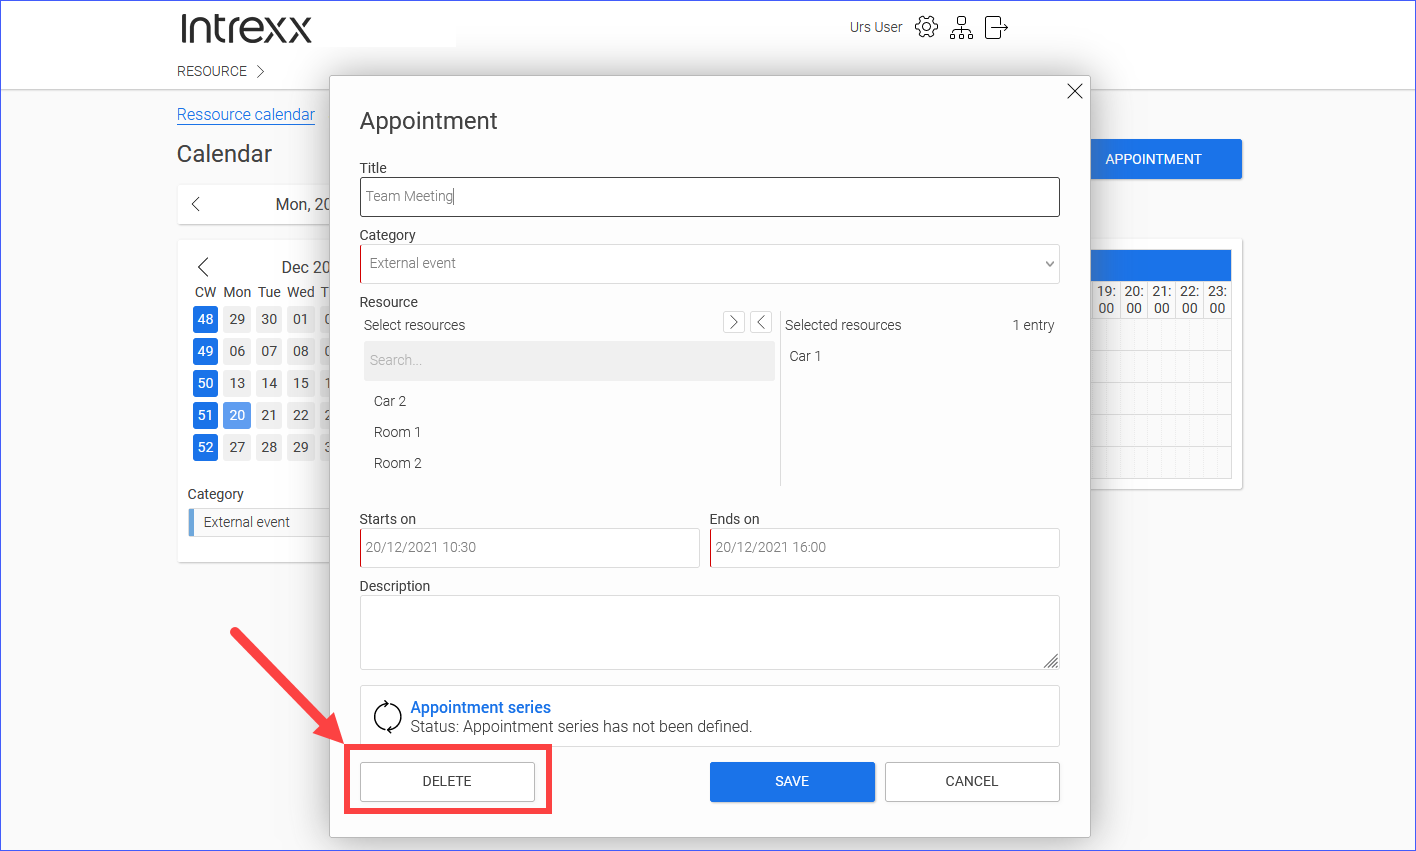
Click on the button.
Then confirm that you want to delete the appointment.
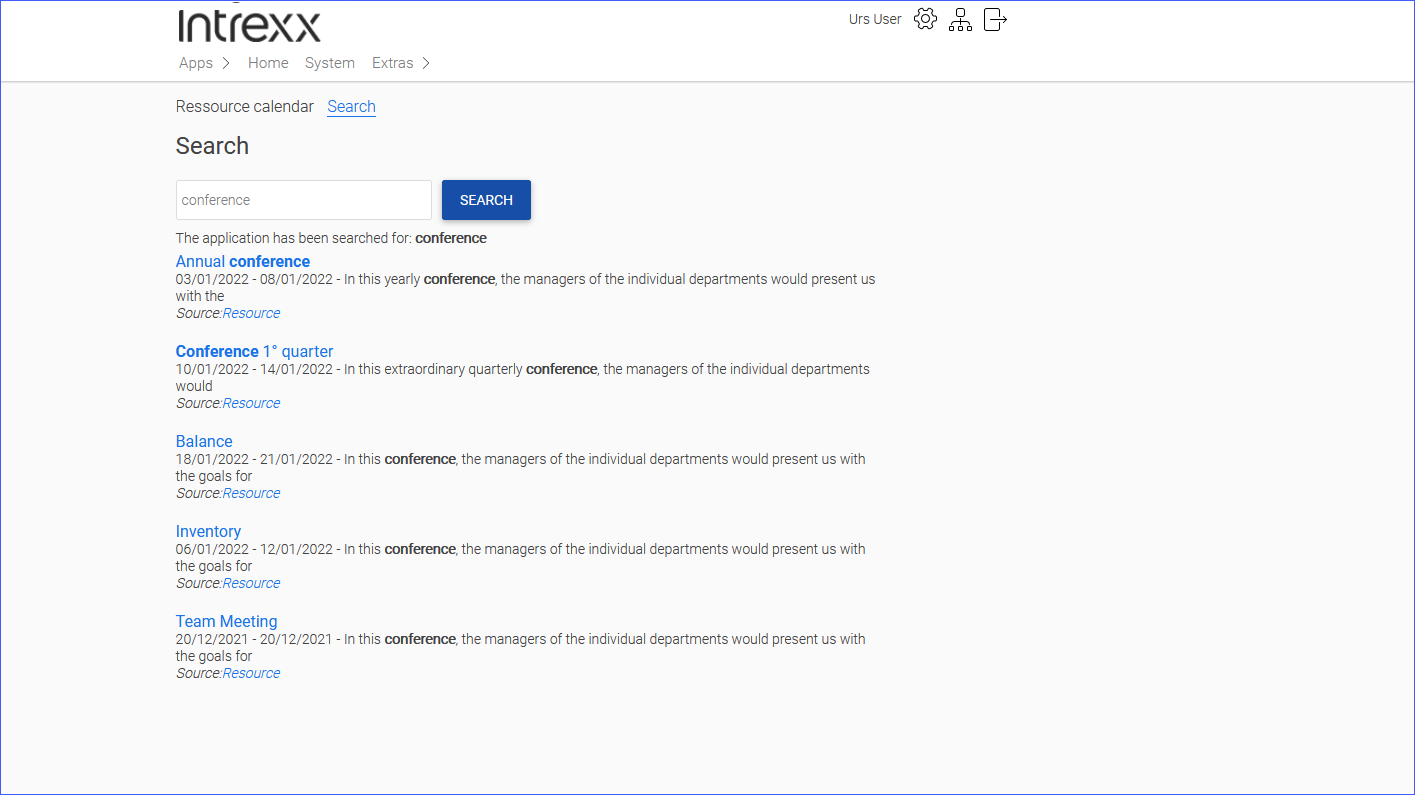
Search for booked resources and appointments
In the "User" role, you have access to the "Search" page. There, you can search for appointments and resources.
The title, category and description of the appointment are included in the search. For resources, the title is included in the search.
![]()
Create new resource
In the "Manager" role, you have access to the "Administration" page. You can create new resources there.
![]()
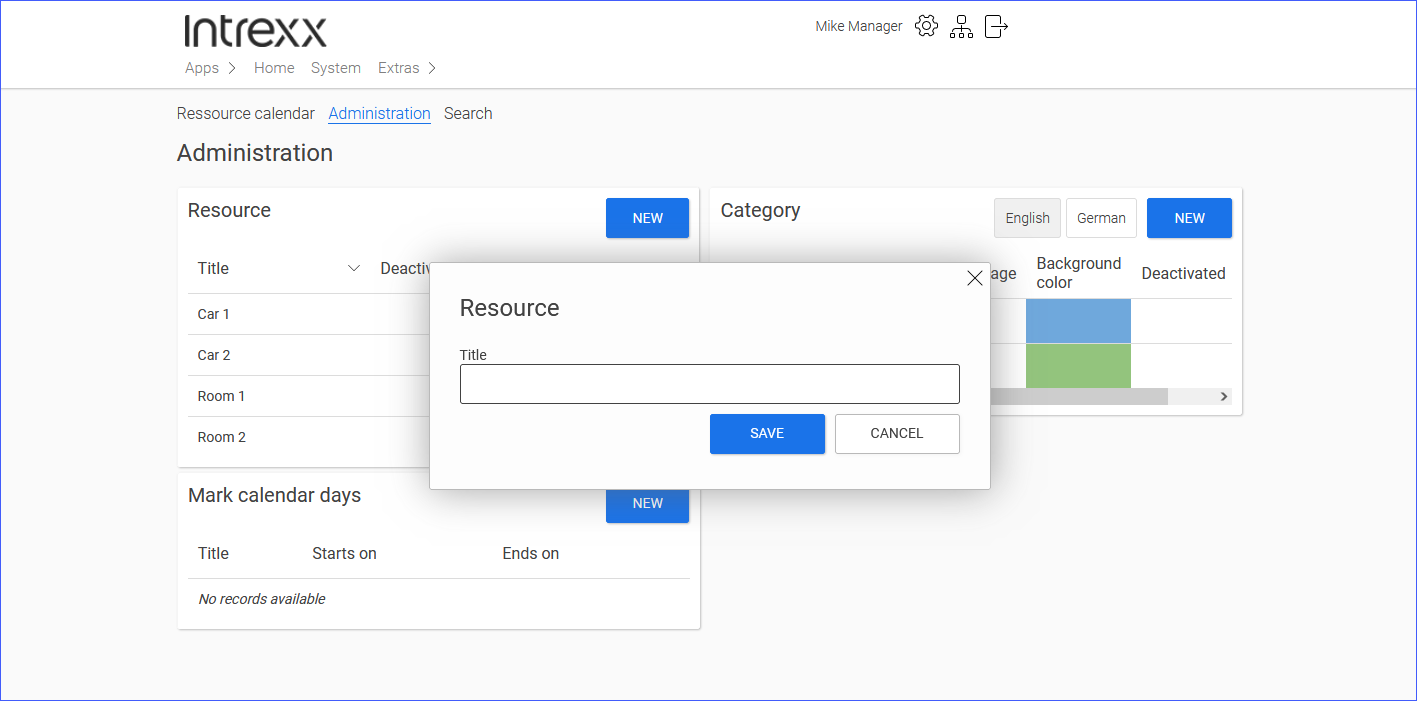
Click on the button to create a new resource.
Enter a title. (Resources are only defined in one language. If you are using a multilingual portal, it is a good idea to define the resource in a language-neutral way or maybe in English).
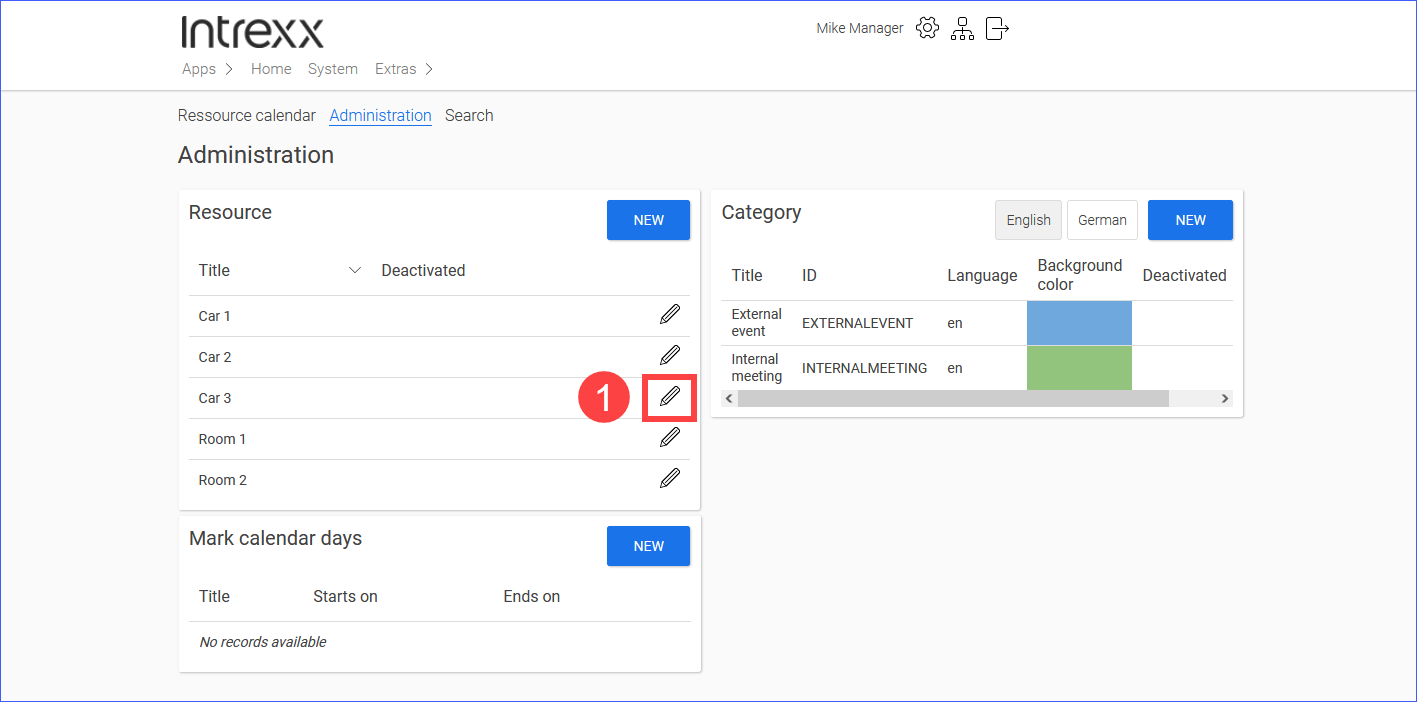
Delete resource, deactivate resource
Resources cannot be deleted manually. They must be deactivated first. The deletion will then be carried out automatically by Intrexx.
In the "Manager" role, you can deactivate resources on the "Administration" page.
Click on the pencil icon (![]() ) to do that.
) to do that.
![]()
In the dialog box, activate the "Deactivate resource" toggle (![]() ).
).
![]()
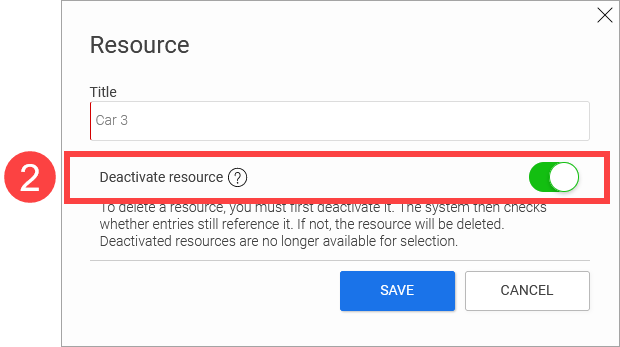
Deactivated resources are automatically deleted by a background job at regular intervals.
Add category
In the "Manager" role, you have access to the "Administration" page. You can create new categories there. When you create appointments, you must assign them to a category. This makes it possible to sort and find individual appointments.
![]()
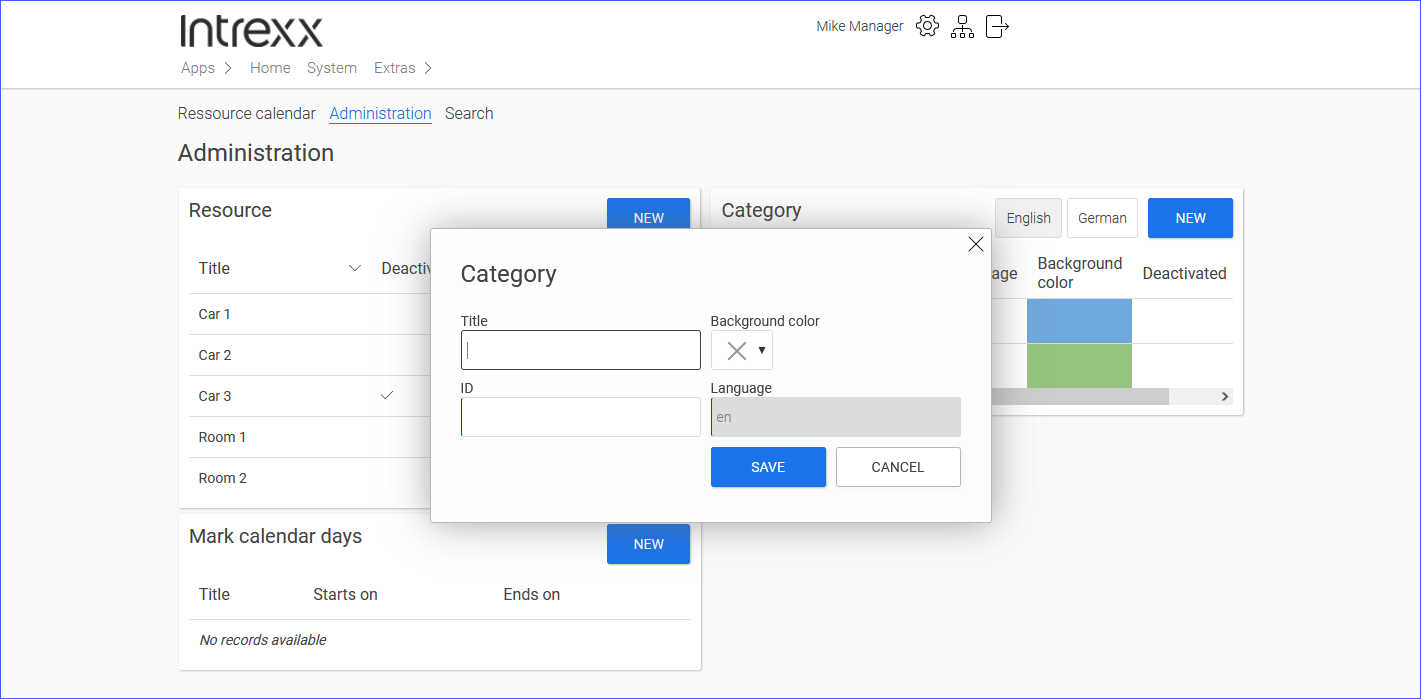
Click on the button to create a new category.
The ID cannot be changed once it has been saved.
Delete category, deactivate category
Categories cannot be deleted manually. They must be deactivated first. The deletion will then be carried out automatically by Intrexx.
In the "Manager" role, you can deactivate categories on the "Administration" page.
Click on the pencil icon (![]() ) to do that.
) to do that.
In the dialog box, activate the "Deactivate category" toggle (![]() ).
).
![]()
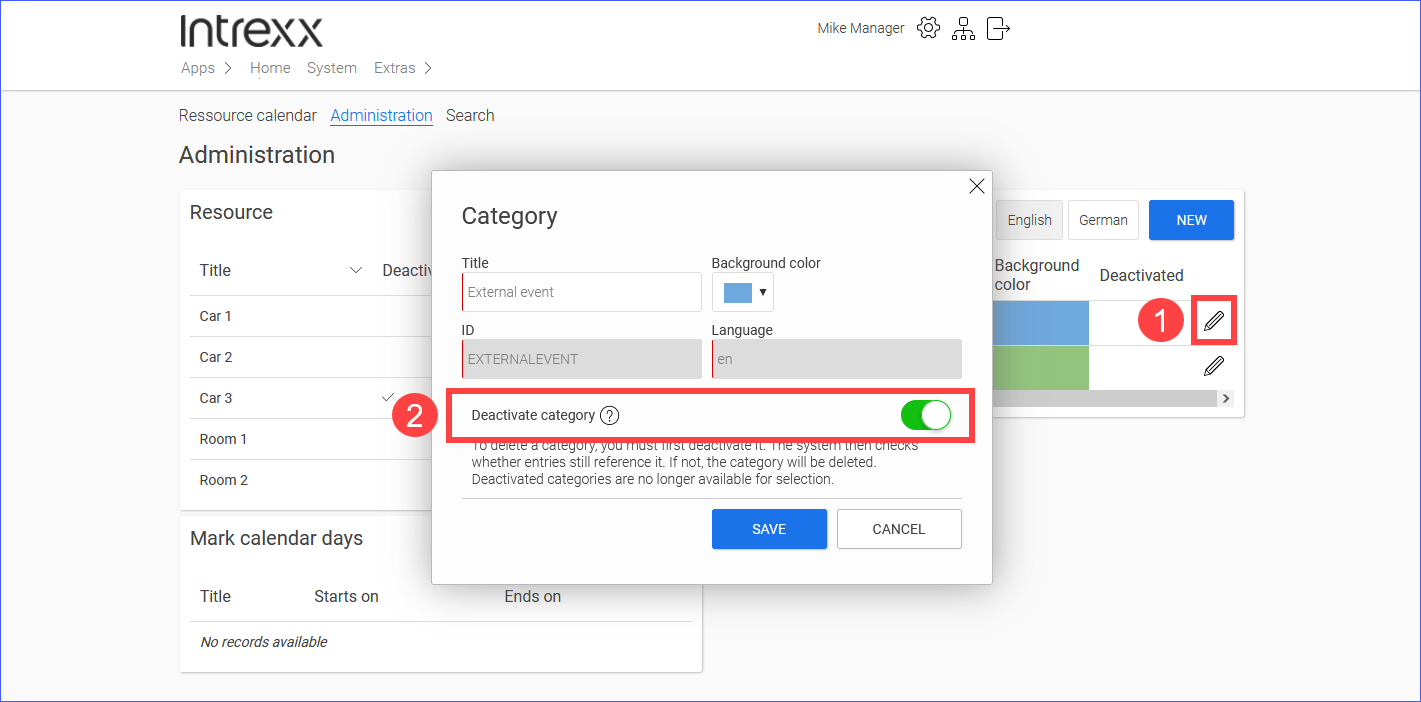
Deactivated categories are automatically deleted by a background job at regular intervals.
Highlight calendar days
In the "Manager" role, you have access to the "Administration" page. You can highlight calendar days there. You can mark days in the resource calendar as calendar days. Typically, these are holidays or other days when resources should not or cannot be booked. The highlighted calendar days are displayed in the resource calendar.
![]()
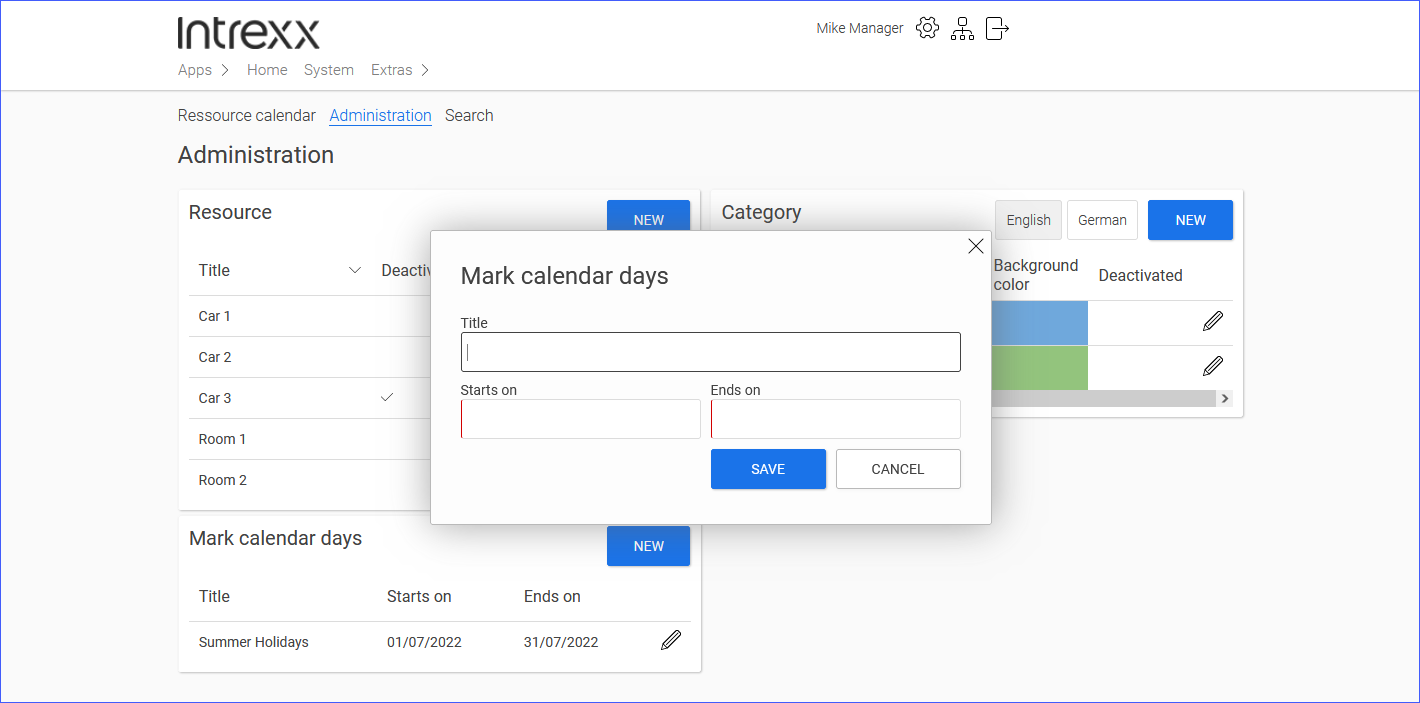
Click on the button to define a new calendar day.
Enter a title, and a start and end date.
Save your entries.
Delete calendar days
In the "Manager" role, you can delete calendar days on the "Administration" page.
Click on the pencil icon (![]() ) to do that.
) to do that.
![]()
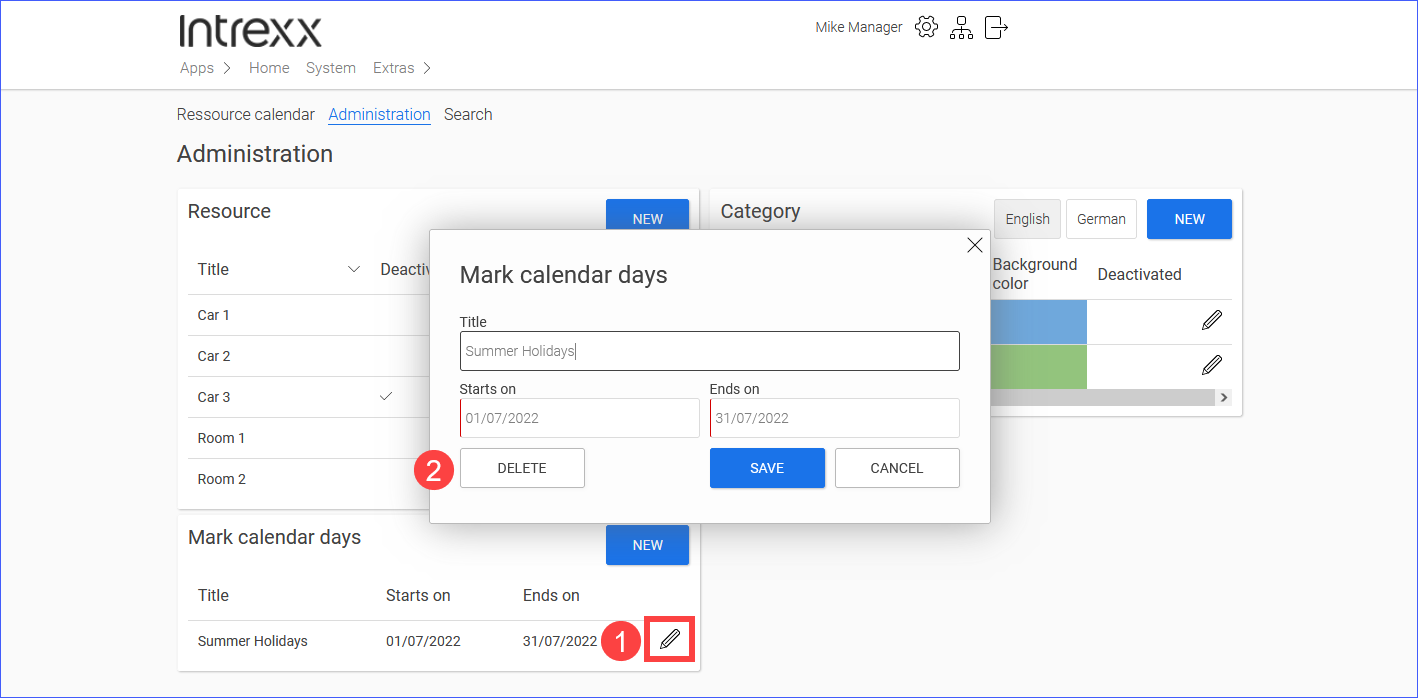
Click on the button (![]() ).
).
Then confirm that you want to delete the calendar day.
Actions in the Portal Manager
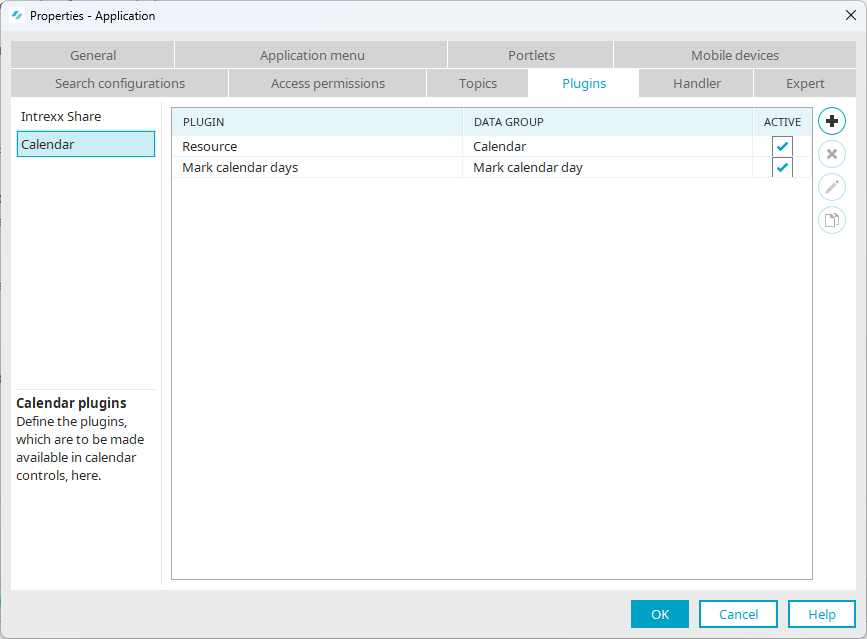
Plugins
The plugins used in the application template can be found here:
"Resource > Properties > 'Plugins' tab"
![]()
More information